If you’re like me and use nixos, you might’ve wondered, how can i configure my editor, neovim, with nix? Well, there are multiple approaches, one of them being configuring programs.neovim with nix and then configuring plugins itself in lua. While it’s alright, I like the other approach more, nixvim .
For me, I started migrating to nix-colors to declaratively color my setup. When I’ve already migrated a lot of things, I needed to color my neovim. I tried to add some extra lua config with nix itself. I couldn’t get it to work. Moreover, my config was getting too bad and unmaintained throwing errors at me on every keypress. So, i decided to try out nixvim.
Keep in mind that as of writing those lines, I’m still learning nixvim and configuring neovim with it, so I might update this post.
Let’s start
NOTE
This post assumes you have a basic understanding of nix and intermediate neovim experience, both configuring and using.
Installation
So, You have your nixos config working and now it’s time to migrate the editor. First of all, you should start by adding nixvim to your configuration.
With flakes:
inputs.nixvim = {
    url = "github:nix-community/nixvim";
    # If you are not running an unstable channel of nixpkgs, select the corresponding branch of nixvim.
    # url = "github:nix-community/nixvim/nixos-23.05";

    inputs.nixpkgs.follows = "nixpkgs";
  };
Without flakes:
{ pkgs, lib, ... }:
let
  nixvim = import (builtins.fetchGit {
    url = "https://github.com/nix-community/nixvim";
    # If you are not running an unstable channel of nixpkgs, select the corresponding branch of nixvim.
    # ref = "nixos-23.05";
  });
in
{
  imports = [
    # For home-manager
    nixvim.homeManagerModules.nixvim
    # For NixOS
    nixvim.nixosModules.nixvim
    # For nix-darwin
    nixvim.nixDarwinModules.nixvim
  ];
}
With this done, you should now have nixvim installed. If you plan on using nixvim in your home configuration itself, don’t forget to remove your old way of installing neovim and your config, as it can (and probably will) break nixvim’s generated config.
While we’re at it, I should mention caveats of nixvim, being:
- No lazy loading
- Not all plugins are packaged (have to use lua)
While the second caveat is not that significant, first can be a deal-breaker for you. While I notice quite a big difference (~20 vs ~200 ms) in loading time compared to my old vim config, it’s not that bad. If you have an older pc and rely on lazy loading a lot, you might want to keep using your old config.
While there is work going on about adding lazy-loading, there is not a lot of progress at the moment of writing.
Usage
To actually use nixvim you can either use it as a home-manager module or as a standalone flake. While being able to download and use your flake on any nix system in one command, home-manager module can provide a better integration with your config. I use a home-manager module approach as I use base16. If you dont need such functionality i highly advise you on using a separate flake.
For this guide i will use nixvim as a home-manager module. When using nixvim as a flake, it’s almost the same, the only difference being is not to use programs.nixvim for your nixvim-related config. To init a nixvim flake you can use
nix flake init --template github:nix-community/nixvimThis will initialize a nixvim flake template in the current directory. The config is located inside config directory with bufferline already being in a separate file. If you look into any file, you will see that it’s just plugins.something and not programs.nixvim.plugins.something. This is the only difference (not counting having to use nix run, of course). The rest is (hopefully) the same.
Let’s install a few plugins, shall we? To do so, create a file for nixvim in your nix config. Then enable nixvim like so:
programs.nixvim = {
    enable = true;
};
Now you should be able to access unconfigured nvim if you rebuild. Let’s go further from here.
To install plugins and colorschemes, configure neovim and do something with nixvim in general, you should refer to the documentation . It’s good and there’s a lot of info here.
For now I’ll add a colorscheme. I will use catppuccin mocha. Then I’ll install lualine. Our file now looks like this
programs.nixvim = {
    enable = true;
    colorschemes.catppuccin = {
        enable = true;
        flavour = "mocha";
    };
    plugins.lualine = {
      enable = true;
    };
};
Now, rebuild. You should see neovim with a colorscheme now and lualine installed. Wonderful.
Nixvim also has options. They are your neovim opts. If you want to show relative line numbers, set shiftwidth to 2 and use termguicolors:
options = {
  number = true;
  shiftwidth = 2;
  relativenumber = true;
  termguicolors = true;
};
As you can see, this is pretty simple.
Same with seting the clipboard to the system clipboard:
programs.nixvim.clipboard.register = "unnamedplus";Or setting leader to space:
programs.nixvim.globals.mapleader = " ";With this in mind you can now configure neovim. For example, let’s install lsp and autocomplete to be able to edit our config with it.
programs.nixvim.plugins = {
  lsp = {
    enable = true;
    servers = {
      nil_ls.enable = true; # Enable nil_ls. You can use nixd or anything you want from the docs.
    };
  };
  nvim-cmp = {
    enable = true;
    autoEnableSources = true;
    sources = [
      {name = "nvim_lsp";}
      {name = "path";}
      {name = "buffer";}
      {name = "luasnip";}
    ];

    mapping = {
      "<CR>" = "cmp.mapping.confirm({ select = true })";
      "<Tab>" = {
        action = ''
          function(fallback)
            if cmp.visible() then
              cmp.select_next_item()
            else
              fallback()
            end
          end
        '';
        modes = [ "i" "s" ];
      };
    };
  };
};
Our entire config file looks like this:
{ ... }: {
  programs.nixvim = {
    enable = true;
    colorschemes.catppuccin = {
      enable = true;
      flavour = "mocha";
    };
    plugins = {
      lualine = {
        enable = true;
      };

      lsp = {
        enable = true;
        servers = {
          nil_ls.enable = true; # Enable nil_ls. You can use nixd or anything you want from the docs.
        };
      };
      nvim-cmp = {
        enable = true;
        autoEnableSources = true;
        sources = [
          {name = "nvim_lsp";}
          {name = "path";}
          {name = "buffer";}
          {name = "luasnip";}
        ];

        mapping = {
          "<CR>" = "cmp.mapping.confirm({ select = true })";
          "<Tab>" = {
            action = ''
              function(fallback)
                if cmp.visible() then
                  cmp.select_next_item()
                else
                  fallback()
                end
              end
            '';
            modes = ["i" "s"];
          };
        };
      };
    };
  };
}
That’s it! You can now write your nixvim config with neovim itself. Find more options in the documentation
But, there is a problem. What if your package is not packaged in nixvim?
Extra plugins
Nixvim supports adding extra plugins and configuring them with lua. I will use smart-splits as an example, as it’s not yet packaged as of writing this (but there is work ongoing that started after I’ve filled an issue )
PS: It’s now in nixvim !
Plugins that are in nixpkgs
Packaging extra plugins is pretty simple. The file looks like this:
{ pkgs, ... }: {
  programs.nixvim = {
    extraPlugins = with pkgs.vimPlugins; [
      smart-splits-nvim
    ];
    extraConfigLua = ''
      require('smart-splits').setup({
        ignored_filetypes = { "nofile", "quickfix", "qf", "prompt" },
        ignored_buftypes = { "nofile" },
      })
    '';
    keymaps = [
      {
        action = "function() require('smart-splits').move_cursor_left() end";
        key = "<C-h>";
        mode = "n";
        lua = true;
      }
      {
        action = "function() require('smart-splits').move_cursor_down() end";
        key = "<C-j>";
        mode = "n";
        lua = true;
      }
      {
        action = "function() require('smart-splits').move_cursor_up() end";
        key = "<C-k>";
        mode = "n";
        lua = true;
      }
      {
        action = "function() require('smart-splits').move_cursor_right() end";
        key = "<C-l>";
        mode = "n";
        lua = true;
      }
    ];
  };
}
Notice here how we are adding a plugin packaged in nixpkgs but not in nixvim itself (highlighted lines). Then we add extraConfigLua to nixvim so that we can setup the plugin. It’s pretty simple if you know lua.
But what if you have some niche plugin that’s not in nixpkgs?
Plugins that are not in nixpkgs
For this example I will add ultimate-autopair which is actually already in nixpkgs, but let’s pretend it isn’t.
We can use buildVimPlugin function to install the plugin like this:
{ pkgs, ... }: {
  programs.nixvim = {
    extraPlugins = with pkgs.vimPlugins; [
      (pkgs.vimUtils.buildVimPlugin {
        pname = "ultimate-autopair.nvim";
        version = "2024-02-05";
        src = pkgs.fetchFromGitHub {
          owner = "altermo";
          repo = "ultimate-autopair.nvim";
          rev = "25c13e0ce167db0255456cac10158b27d2be30c0";
          sha256 = "0bsxfj6g8fii9nn92vl15hdhafx3fikgiz4srr7y10pxz01c5s4c";
        };
      })
    ];
    extraConfigLua = ''
      require('ultimate-autopair').setup()
    '';
  };
}
As you can see, you install the plugin similar to one in nixpkgs, it’s just buildVimPlugin that’s different.
The problem with this approach is that you need to manually change rev and sha256 to update the plugin. I suggest you to request it to be packaged in nixvim if you think that it should be packaged.
Another thing to keep in mind with installing plugins from nixpkgs/github directly is that breaking changes can occur and that you will need to change your lua code. If you can, try to find an alternative plugin. If you can’t, try to package it in nixvim if you have the knowledge. If not, file an issue.
Modularizing the config
If you look at our config file now, it’s quite big. And our config is very simple! Imagine what would happen if your config would be ten times bigger? This is no good. That’s why you should modularize the config.
I personally separate it in multiple directories and then files inside, but for this guide i will just separate them into files with no directories. Create another file, say, bufferline.nix. In it we can just write something like this:
{ ... }: {
  programs.nixvim.plugins.bufferline = {
    enable = true;
  };
}
Then, we need to import the file in the main config.
{ ... }: {
  imports = [
    ./bufferline.nix
  ];
  programs.nixvim = {
    # ...
  };
}
As you can see, modularizing your config is as simple as having multiple programs.nixvim entries (same but without programs.nixvim in a separate flake).
My config structure is as follows:
.
├── default.nix
└── plugins
    ├── default.nix
    ├── lsp
    │   ├── actions-preview.nix
    │   ├── conform-nvim.nix
    │   ├── default.nix
    │   ├── lint.nix
    │   ├── lsp.nix
    │   ├── none-ls.nix
    │   ├── nvim-cmp.nix
    │   ├── smart-splits.nix
    │   ├── treesitter.nix
    │   └── ultimate-autopair.nix
    ├── mini
    │   ├── animate.nix
    │   └── default.nix
    ├── ui
    │   ├── alpha.nix
    │   ├── bufferline.nix
    │   ├── default.nix
    │   ├── gitsigns.nix
    │   ├── indent-blankline.nix
    │   ├── lualine.nix
    │   ├── noice.nix
    │   ├── notifications
    │   │   ├── default.nix
    │   │   └── fidget.nix
    │   ├── nvim-colorizer.nix
    │   └── which-key.nix
    └── utils
        ├── comment-nvim.nix
        ├── default.nix
        ├── guess-indent.nix
        ├── hop.nix
        ├── neo-tree.nix
        ├── persistence.nix
        ├── telescope
        │   ├── default.nix
        │   ├── project-nvim.nix
        │   └── telescope.nix
        └── toggleterm.nix
You can find the config on my github
Useful snippets
After using nixvim for a while I’ve added some cool stuff to my nixos config. Here are all the snippets of them:
Exit telescope on single escape press.
To do so, just add this to your telescope config:
programs.nixvim.plugins.telescope = {
  defaults = {
    mappings = {
      i = {
        "<esc>" = {
          __raw = ''
            function(...)
              return require("telescope.actions").close(...)
            end
          '';
        };
      };
    };
  };
};
Then it should just work after a rebuild
Customizing which-key groups
Groups in which-key are something like +prefix by default. I have them like so:
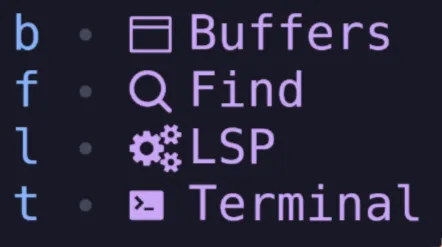
To do the same (for this example to add Find one from my config) just include this piece of code in your config:
programs.nixvim.plugins.which-key.registrations = {
"<leader>f".name = " Find";
};And if you want to get the same circle separator:
programs.nixvim = {
plugins.which-key = {
enable = true;
icons = {
separator = "";
group = "";
};
};
};Using neovim from master (0.10 for now)
If you want to use neovim compiled from master (say, to get inlay hints), it’s possible.
If you use flakes the process is simple. Just add a new input like so:
inputs.neovim-nightly-overlay.url = "github:nix-community/neovim-nightly-overlay";And then, add an overlay:
nixpkgs.overlays = [
  inputs.neovim-nightly-overlay.overlay
];
If you don’t use flakes, just add the overlay from github:
nixpkgs.overlays = [
  (import (builtins.fetchTarball {
    url = https://github.com/nix-community/neovim-nightly-overlay/archive/master.tar.gz;
  }))
];
After that just set package in nixvim:
programs.nixvim.package = pkgs.neovim-nightly;After that, rebuild. You should now have latest neovim.
Using base16 colorscheme
If you’re like me and use nix-colors for your colorscheme (or any base16 colorscheme for that matter), you might want to rice your nixvim automatically. Nixvim has such option, being colorschemes.base16.
To use it, all you need to do is:
Usage with nix-colors:
programs.nixvim.colorschemes.base16 = {
  enable = true;
  customColorScheme =
    lib.concatMapAttrs (name: value: {
      ${name} = "#${value}";
    })
  config.colorScheme.palette;
};
If you don’t use nix-colors, process is same. You just set customColorScheme to an attrset of values like this one:
{
  base01 = "#color";
  base02 = "#color2";
  # ... goes on
}
There is also an option of using colorScheme (naming is strange, I know) which accepts a string of the colorscheme itself and then uses base16 variant. For example, you can set it to catppuccin-mocha or gruvbox-dark-medium.